Monday, January 24, 2011

Vegetable Ragu


My mom loves to cook. This is her favorite vegetable dish during summer when she has vegetables from her garden. This is my favorite Ukrainian vegetable dish too. I love that I do not have to wait until summer comes, because here I could buy vegetables all year around. 


You will need:
3 cups shredded cabbage
2 medium zucchini
2 large potatoes
2 medium tomatoes
1 large carrot
1 medium onion
2 Tbsp corn or olive oil
salt, pepper, sugar to taste

1. Dice zucchini, potatoes and onion. Shred carrot. Slice tomatoes. 

2. Heat the oil in a large skillet that has a cover. Cook tomatoes on one side for 2-3 minutes, then cook them on the other side for 2-3 minutes.


3. Put vegetables in layers. Start with diced onion and shredded carrot. Season each layer with a bit of salt .


4. Add diced potatoes.


 5. Add shredded cabbage.


6. Add diced zucchini.


7. Let it simmer on a medium heat for 3-4 minutes. 

8. Mix vegetables. And continue to mix every 3 minutes. Depending on how juicy your vegetable are, you can leave the skillet open (if you have a lot vegetable juice), or cover if you do not have a lot of juice. Ideally at the end you will have cooked vegetables and almost no vegetable juice. Season with pepper, add more salt according to your taste. I also like to put 1/2 Tbsp of sugar, but this is optional.


9. Dish is ready when potatoes are done.

Friday, January 21, 2011

Borsch


My mom has cooked borsch often but I did not know how to cook it. I got married and left Ukraine right away. I knew I had to master how to cook this dish because my husband loved borsch. Usually he would leave home early in the morning and come back to have lunch at home. This gave me plenty of time to practice, and if my first attempt would fail I still had time to try it again. My first attempt of making borsch was a success! Now everyone in my family loves borsch.  

You will need: 
1 beet
2 carrots
4 potatoes
1 onion
2-3 cups shredded cabbage
1 can (8oz) tomato sauce
2 Tbsp lemon juice or 1/2 Tbsp vinegar
1 Tbsp sugar
2 Tbsp corn oil
salt, pepper to taste
parsley, dill, bay leaf, garlic (optional)


Borsch can be a vegetable soup or based on either chicken or other meat bouillon. 
1. In a large pot prepare bouillon or pour water to 2/3 of a your pot, add salt. Bring to boil.

2. While water in your pot is heating, peal and grate carrots and beet. Peal and dice potatoes. Shred cabbage. Peal skin from the onion.


3. Saute grated carrots and beet with corn oil until it will be cooked according to your taste. I like it more on crunchy side, so I cook for about 10 minutes. You can add a little water while cooking vegetables.


4. Add 2/3 of tomato sauce and saute for 2-3 more minutes. Add sugar and lemon juice.


5. Add potatoes and onion to your pot with boiling water. Cook for 10 minutes.

6. Add shredded cabbage. Cook for 5-7 minutes for more crunchy taste or for a few minutes more if you like your cabbage well cooked.


7. After cabbage is done according to your taste,  add sauteed vegetables and rest of the tomato sauce. Add more salt if needed.


8. Season with pepper, parsley and dill. Bring to boil. Do not let it boil for a long time because borsch will lose its color. Serve hot with sour cream and bread.

Friday, January 14, 2011

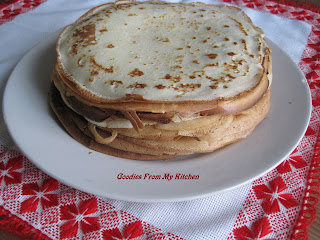
Nalystnyky (French Crepes)


This crepes are easy to make. Can be served with sour cream, jam or whatever suits you. Also can be stuffed. I like to fill it with cream cheese filling. Recipe for the filling I will post later.

You will need:
2 cups all purpose flour
2 eggs
2 1/2 cups milk
1/2 cup water
2 Tbsp corn oil
2 Tbsp sugar (less or more according to your taste)
1/4 tsp salt


1. Using blender mix all liquid ingredients except corn oil.


2. Mix in sugar, salt and gradually add flour. Batter should not be lumpy.


3. Add corn oil. Mix a bit more.


Batter will look like this

4. Heat the pan until very hot.
5. Pour the batter onto the pan. Watch my video below for how to do it. Cook on one side.


6. When one side is ready it will look like this. Carefully pick up with spatula and flip it on the uncooked side. Cook it until it will be ready.


7. Repeat with remaining batter.


Thursday, January 6, 2011

Butterhorns (Rogaliki)


I love bread. I love to bake bread. I love to be able to bake these rolls because they taste exactly like bread rolls I ate when I was a child. They where called “Rogaliki”, which means “horns”, but in my area they did not looked like horns (where not bended), but where called “horns” anyway.


You will need:
3 cups all purpose flour
1 cup bread flour  
2 1/4 tsp yeast
1 tsp salt
3 tsp sugar
6 Tbsp margarine or butter 

some butter or margarine for brushing
1 cup and 2 Tbsp water

Makes 12 rolls


1. Dissolve yeast in warm water in bread machine. Stir in sugar and 1 teaspoon of flour. Let it stand for 15 minutes until it will rise a bit and will have bubbles.

2. Add butter, flour and salt. Select dough cycle on your bread machine. My bread machine dough cycle is 1 hour 30 minutes.


3. When dough is ready divide it to 12 portions. Cover with a towel and let it stand for 5-10 minutes. 


4. Melt butter or margarine. On a floured surface, take one portion, and roll it into a 4 x 8 inch square. Brush with the melted butter. Roll up jelly-roll style.


5. Place each roll on baking sheet layered with parchment paper at least 1" apart. You will need 2 baking sheets. On each sheet there will be 6 rolls. Warm oven just a little (not for baking). Place any oven proof pot or bowl with boiling water on lower rack of the oven. Place rolls inside the oven. Let is stand there 30 minutes. Replace water when it gets colder with boiling water. The reason for this is that rolls need to rise under high humidity. 


6. Remove rolls and the pot with water from the oven. 


7. Heat the oven to 350F. While oven gets warm brush rolls with water. Place the pot with boiling water back in the oven. Bake rolls on the middle rack for 15-20 minutes. My rolls had a pale color, so I set the oven thermostat to BROIL during last few minutes of baking, so they would have a golden color.

8. Let it cool for a  few minutes and enjoy!


Goodies From My Kitchen   © 2008. Distributed by Blogger Templates. Template Recipes by Emporium Digital

TOP